วันศุกร์ที่ 4 มีนาคม พ.ศ. 2559

Command Line : SCP (Linux)

การส่งผ่านหรือการโอนถ่ายข้อมูลจากคอมพิวเตอร์เครื่องหนึ่งไปอีกเครื่องหนึ่งสามารถทำได้โดยคำสั่ง scp

scp (secure copy) คือ การทำ secure transfer file ระหว่าง local และ remote host หรือระหว่าง remote host 2 เครื่องก็ได้ โดยใช้ secure shell protocol (SSH) พูดง่ายๆว่า เครื่องที่เราจะส่งข้อมูลต้องอยู่วงแลนเดียวกัน

รูปแบบคำสั่ง

scp <File> User@host:directory/<File>

File  คือ ไฟล์ที่เราต้องการส่งไปอื่นเครื่องหนึ่ง
User คือ Userของเครื่องที่เราจะส่งไป (User name Login)
host คือ  Hostname ของเครือง หรือ *IP address ของเครื่องที่เราจะส่งไป 
Directory คือ Path ปลายทาที่เราจะส่ง

 * IP address  ดูจากการใช้คำสั่ง ifconfig

นอกจากนี้เรายังสามารถคัดลอกเป็นโฟล์เดอร์ก็ยังได้เพียงเพียงแค่ใส่ -r หน้า scp
 แบบนี้ scp -r <Folder> User@host:directory 

ยกตัวอย่่าง
scp -r testflow root@192.168.1.50:/root/test/

**หมายเหตุ : หากมีข้อความให้ตอบ <yes/no> ให้พิมพ์ yes นะครับเครื่องจะส่งข้อมูล จะถามเฉพาะครั้งแรกที่โอนไฟล์ในครั้งนั้น

นิพจน์ปรกติ Regular Expressions Part END

[] 
ใช้เขียนแทนอักขระหนึ่งตัวที่อยู่ในขอบเขต ซึ่งระบุไว้ภายในวงเล็บ เช่น "[bcdf]an" มีความหมายว่า ban can dan และ fan
                           ----------------------------------------------------------------------------------------------------
ยัติภังค์ ใช้เขียนภายในวงเล็บเหลี่ยมระหว่างอักขระสองตัว เพื่อบ่งบอกว่าเป็นอักขระหนึ่งตัวที่มีรหัสแอสกีหรือยูนิโคดยู่ในช่วงนั้น เช่น "[a-z]an" มีความหมายว่า aan ban can เรื่อยไปจนถึง zan
                                  ----------------------------------------------------------------------------------------------------
ปรัศนี ใช้บ่งบอกว่ามีนิพจน์ก่อนหน้านี้จำนวน 0 หรือ 1 นิพจน์ (มีนิพจน์หรือไม่มีก็ได้) เช่น "ปร?กติ" มีความหมายว่า ปกติ หรือ ปรกติ
                                 ----------------------------------------------------------------------------------------------------
+
เครื่องหมายบวก ใช้บ่งบอกว่ามีนิพจน์ก่อนหน้านี้จำนวน 1 นิพจน์หรือมากกว่า เช่น "go+gle" มีความหมายว่า gogle google gooogle เป็นต้น แต่ไม่เท่ากับ ggle
                                 ----------------------------------------------------------------------------------------------------

{n}

วงเล็บปีกกาใช้บ่งบอกว่าต้องมีนิพจน์ก่อนหน้านี้จำนวน n นิพจน์ เช่น "go{5}gle" มีความหมายว่า gooooogle เพียงตัวเดียว

{m,n}

วงเล็บปีกกาที่มีจุลภาคข้างใน ใช้บ่งบอกว่าต้องมีนิพจน์ก่อนหน้านี้จำนวน m นิพจน์ถึง n นิพจน์ เช่น "go{2,4}gle" มีความหมายว่า google gooogle และ goooogle หากไม่ระบุตัวเลข n จะหมายถึงต้องมีนิพจน์จำนวนตั้งแต่ m นิพจน์เป็นต้นไป
​                                 ----------------------------------------------------------------------------------------------------
^
เครื่องหมายหมวก ใช้เขียนเป็นตัวแรกสุดของนิพจน์ปรกติ เพื่อบ่งบอกว่านิพจน์ที่ต้องการค้นหาอยู่ต้นบรรทัดหรือต้นสตริงเท่านั้น สามารถใช้คู่กับ $
                                 ----------------------------------------------------------------------------------------------------

$
เครื่องหมายสกุลเงิน ดอลลาร์ ใช้เขียนเป็นตัวท้ายสุดของนิพจน์ปรกติ เพื่อบ่งบอกว่านิพจน์ที่ต้องการค้นหาอยู่ท้ายบรรทัดหรือท้ายสตริงเท่านั้น สามารถใช้คู่กับ ^

นิพจน์ปรกติ ( Regular Expressions) Part1

บทนี้ว่าด้วยเรื่อง  นิพจน์ปรกติ ( Regular Expressions)😒 มาไทยๆเลยวันนี้
ต้องขอบคุณบทความนี้จาก wikipedia ครับ มาเริ่มกันเลยมันคืออะไร

นิพจน์ปรกติ (อังกฤษregular expression สามารถย่อได้เป็น regexp หรือ regex) ในวิทยาการคอมพิวเตอร์ คือ สตริที่อธิบายถึงรูปแบบของสตริงตามโครงสร้างรูปแบบที่กำหนด ในการค้นหาและปรับเปลี่ยนข้อความ ภาษาโปรแกรมหลายภาษายังรองรับการใช้นิพจน์ปรกติสำหรับการจัดการและปรับเปลี่ยนสตริง

❓❓❓ เริ่มต้นคงงงกันหน่อย เริ่มตัวแรกอย่างง่ายน่าจะพอจำได้กันคือ *  เครื่องหมายดอกจันนะครับก็อยู่ในกลุ่ม Regular เช่นกัน

🙋โทษครับผมไม่รู้จักมันคืออะไร และใช้ยังไง
💻 เอาตัว*  เครื่องหมายดอกจันแล้วกันนะครับ หมายถึง ให้เป็นตัวอักษรใดๆก็ได้(ไม่มีอักษรก็นับ) นับตั้งแต่อักษรก่อนหน้านี้ 0คำขึ้นไป เช่น  ถ้าเรามีคำ  Good Gold  Gd  God
        ถ้าเราสนใจแต่ตัวแรกเป็น G และตัวสุดท้ายคือd โดยไม่าสนใจตัวกลาง เราก็สามารถเขียนเป็นรูปแบบ  Go*d
        หมายเหตุ ถ้า * ไปใช้กับการหาคำ จะหมายความว่า การทำซ้าจากตัวหน้า

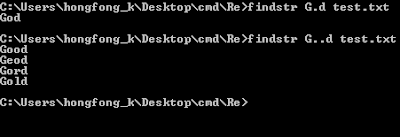
💻  ตัวจุด (.) คือ อักษรใดๆ 1 ตัว ใช้บนคำ เท่านั้น 🚫ห้ามใช้บนการหาไฟล์   (งงไหมครับ)
ยกตัวอย่างการใช้จุด  
รูปแบบคำสั่ง  findsrt  [คำ] [ไฟล์]


จากรูป การใช้1จุดเพื่อแทนการหา1อักษรระหว่าง G และ d เท่านั้น
ส่วนบรรทัดที่สอง การใช้2จุดเพื่อแทนการหา2อักษรระหว่าง G และ d เท่านั้น

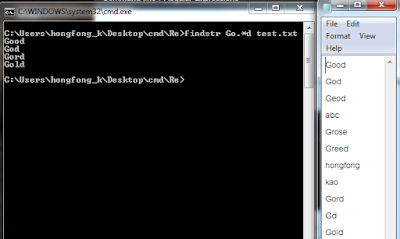
หรืออีกวิธีการใช้จุด(.)และดอกจัน(*)ผสมกันในการหาคำ ในไฟล์ ระหว่าง


👤บางคนอาจจะถามว่า ทำไมไม่ตัดจุดออกละครับ ในเมื่อเราจะเอาทุกคำ


💫ผลออกมาได้มาไม่ตรงกับที่เราคิด💫 เพราว่าดอกจันหมายถึงทำซ้ำบนการหาคำหาใช้เดียวๆหมายถึง
1.ตัดตัวที่อยู่หน้าดอกจันออก เพื่อหาผล  >> Gd  และ God
2.มองหาตัวที่เหมือนกับตัวอักษรหน้าดอกจันมาแทนตัวเอง Good


ส่วนการใช้ดอกจับบน คำสั่งDir ก็ยังเหมือนเดิม เป็นทุกตัวอักษรครับ
💻 ถ้ามีไฟล์ serial number  ที่เราต้องการหาเฉพาะก็ได้   >> dir EADSS*.log หรือ  ต้องการทุกนามสกุล 95521.*

วันอาทิตย์ที่ 14 กุมภาพันธ์ พ.ศ. 2559

Command line : RD

RD
Remove Directory
คำสั่ง RD เป็นคำสั่งใช่ลบโฟล์เดอร์ รูปแบบคำสั่งง่ายๆครับตามข้างล่างนี้เลย
Syntax
      RD pathname
      RD /S pathname
      RD /S /Q pathname
   
Key
   /S  : Delete all files and subfolders
         in addition to the folder itself.
         Use this to remove an entire folder tree.
                  ลบทุกไฟล์ และ ทุกโฟล์เดอร์ย่อย


     /Q : Quiet - do not display Y/N confirmation
         ไม้ต้องแสดงบนหน้าจอถาม Y/N เพื่อยืนยันการลบ

         RD will only delete an empty folder.
        ถ้าใช้คำสั่ง RD เพื่อลบโฟล์เดอร์จะใช้ได้เฉพาะโฟล์เดอร์เปล่าเท่านั้นนะครับ


หากต้องการลองคำสั่งนี้ให้สร้างโฟล์เดอร์จำลองเพื่อทำการทดลองนะครับ หากไปใช้จริงข้อมูลที่ไม่ได้สำรองข้อมูลไว้เอาคือกลับมาไม่ได้นะครับ

Please Backup data or simulator folder before try this command
       

Command line : Xcopy

XCOPY

Copy files and/or directory trees to another folder. XCOPY is similar to the COPY command except that it has additional switches to specify both the source and destination in detail.
Xcopy has been deprecated under Vista and Windows 2008, this means that while still available now it might disappear in a future OS release. To ensure your scripts are 'future proof' use other tools (such as Robocopy) instead of xcopy. 

การคัดลอก หรือ สำเนาไฟล์ และ/หรือโฟล์เดอร์ทั้งแบบโฟล์เดอร์เดียว และ โฟล์เดอร์ที่มีย่อยๆในโฟล์เดอร์นั้นๆ XCOPY จะคล้ายคลึงกับคำสั่ง COPY.

  XCOPY is particularly useful when copying files from CDROM to a hard drive, as it will automatically remove the read-only attribute.

Xcopy เป็นประโยชน์อย่างยิ่งเมือคัดลอกไฟล์จาก CDROM ไปฮาร์ดิสมันจะลบ read-only attribute อัตโนมัติ


Syntax
      XCOPY source [destination] [options]

Key
        source : Pathname for the file(s) to be copied (accepts wildcards).

        destination : Pathname for the new file(s).   
 
        [options] can be any combination of the following: Source

Options  
 
      /A Copy files with the archive attribute set (default=Y)

      /M Copy files with the archive attribute set and turn off the archive attribute, use this option when making regular Backups (default=Y)  

 
     /H Copy hidden and system files and folders (default=N)
                 คัดลอกไฟล์ที่ตั้งค่าซ่อนไว้ และ ไฟล์ระบบ และ โฟล์เดอร์

     /D:mm-dd-yyyy Copy files changed on or after the specified date. If no date is given, copy only files whose source date/time is newer than the destination time.   
     /U Copy only files that already exist in destination.

     /S Copy folders and subfolders
                 คัดลอกโฟล์เดอร์และโฟล์เดอร์ย่อย   

     /E Copy folders and subfolders, including Empty folders. can be used to modify /T.
      คัดลอกโฟล์เดอร์และโฟล์เดอร์ย่อย รวมไปถึงโฟล์เดอร์เปล่าสามารถใช้option /T แทนได้

/EXCLUDE:file1[+file2][+file3]...
The files can each contain one or more full or partial pathnames to be excluded. When any of these match any part of the absolute path of a SOURCE file, then that file will be excluded.
         For example, specifying a string like \obj\ or .obj will exclude all files underneath the directory obj or all files with the .obj extension respectively.

Copy Options

     /W Prompt you to press a key before starting to copy.
     ข้อความบอกรอกดปุ่มใดๆเพื่อเริ่มทำการคัดลอก 

 
      /P Prompt before creating each file.
                  ข้อความบอกก่อนสร้างไฟล์หรือไดเร็กทรอรี่ หากต้องการสร้างไฟล์พิมพ์  F  ถ้าต้องการ ไดเร็คทรอรี่ให้พิมพ์  D ตามด้วย Enter เนื่องจากคำสั่งนี้จะถามทุกไดเร็คทรอรี่ และ ทุกไฟล์ต้องคอยมานั่งตอบมันตลอดเวลาและต้องรู้ว่าที่เครื่องถามกลับว่าให้สร้างไฟล์หรือไดเร็กทรอรี่ หากเครื่องถามสร้างไดเร็คทรอรี่ แล้วเราพิมพ์ F เพื่อสร้างไฟล์มันจะสร้างผิดและมันจะไม่คัดลอกไฟล์ในนั้น
          
              ยกตัวอย่าง
                                                                              c:\

              ถ้าเรามีไฟล์อยู่ในโฟล์เดอร์แล้วเราต้องการคัดลอกเมื่อเราส่งคำสั่งไปเครื่องจะมองสิ่งที่เจอก่อน คือ โฟล์เดอร์ มันก็จะถ้าจะสร้างไฟล์หรือโฟล์เดอร์ ต่อมาจะถามว่าคัดลอกไฟล์หรือไม่ Y/N


   /Y    Suppress prompt to confirm overwriting a file.
         can be preset in the COPYCMD env variable.
                  สำหรับ option /Y เราต้องการเขียนไฟล์ทับทั้งหมด


   /-Y   Prompt to confirm overwriting a file.
                                      สำหรับ option /-Y จะมี3อย่างที่จะถามเรา คือ  Yes/No/ALL
                    1. Yes ต้องการเขียนทับไฟล์นี้หรือไม่ ถามเป็นไฟล์ต่อไฟล์ไป
                    2. No   ไม่ต้องการเขียนทับ หรือ skip  ถามเป็นไฟล์ต่อไฟล์ไป
                    3.All    เขียนทับทุกไฟล์

                    ยกตัวอย่าง ถ้าเรามีไฟล์ที่3 ที่ไม่ต้องการเขียนทับ (หรือมองตามชื่อไฟล์ก็ได้) เราจะตอบแบบนี้ครับ                    ไฟล์1 ตอบ Yes
                   ไฟล์2 ตอบ Yes
                   ไฟล์3 ตอบ no
                   ไฟล์4 ตอบ All


   /V Verify that the new files were written correctly.

   /C Continue copying even if an error occurs.
      คัดลอกต่อไปถึงแม้จะเจอความผิดพลาด

    /I If in doubt always assume the destination is a folder e.g. when the destination does not exist.

    /B Copy the Symbolic link itself, not the target of the file.   

    /G Allow the copying of encrypted files to a destination that does not support encryption.

    /J Copy using unbuffered I/O. Recommended for very large files.

    /Q Do not display file names while copying.   

    /F Display full source and destination file names while copying.
        สำหรับ option /F จะแสดงpath ต้นทางและ ปลายทางให้ดูว่าเราคัดลอกไปที่ใด

    /L List only - Display files that would be copied.   
    /Z Copy files in restartable mode. If the copy is interrupted part way through, it will restart if possible. (use on slow networks)


Destination Options (option สำหรับ ปลายทาง)

     /R Overwrite read-only files
        เขียนทับเฉพาะ read-only files

     /T Create folder structure, but do not copy files. Do not include empty folders or subfolders. /T /E will include empty folders and subfolders.
        สร้างโฟล์เดอร์ โดยไม่ต้องให้เครื่องถาม

      /K Copy attributes. XCOPY will otherwise reset read-only attributes.
  
     /N If at all possible, use only a short filename (8.3) when creating a destination file. This can be necessary when copying between disks that are formatted differently e.g NTFS and VFAT, or when archiving data to an ISO9660 CDROM.   

     /O Copy file Ownership and ACL information.  
 
     /X Copy file audit settings (implies /O).
 

XCOPY will accept UNC pathnames.
To always overwrite destination files use the COPYCMD environment variable: SET COPYCMD=/Y

When comparing Dates/Times the granularity (the finest increment of the timestamp) is 2 seconds for a FAT volume and 0.1 microsecond for an NTFS volume.

Command line : MD or MKDIR

MD หรือ MKDIR

Make Directory - Creates a new folder. คำสั่งสร้างโฟลเดอร์ใหม่

Syntax
        MD [drive:]path

Key
 The path can consist of any valid characters up to the maximum path length available

 You should avoid using the following characters in folder names - they are known to cause problems
  คุณควรหลีกเลี่ยงตัวอักษรนี้ในการตั้งชื่อโฟล์เดอร์ อาจจะมีปัญหาภายหลัง
© ® " - & ' ^ ( ) and @

Many extended characters will not be recognised by older 16 bit windows applications.

The maximum length of a full pathname (folders and filename) under NTFS or FAT is 260 characters.
ความยาวสูงสุดของชื่อ PATH (ทั้งโฟล์เดอร์และชื่อไฟล์)ของ NTFS หรือ FAT คือ 260ตัว หากตั้งเกินระบบจะเตือน "is to long"

 Folder names are not case sensitive, but only folder names longer than 8 characters will always retain their case, as typed.
ชื่อโฟล์เดอร์ที่ตั้งขึ้นไม่สนใจเรื่องของอักษรตัวเล็กและตัวใหญ่
C:\temp> MD MyFolder

การใช้คำสั่งนี้จะสร้างโฟล์เดอร์แยกเป็น 3 โฟล์เดอร์คือ
C:\temp> MD Alpha Beta Gamma

จะสร้างออกมาแบบนี้

C:\temp\Alpha\
C:\temp\Beta\
C:\temp\Gamma\

ไม่ใช่ X Alpha Beta Gamma    X
หากเราต้องการชื่อโฟล์เดอร์แบบนี้ ต้องใช่คำสั่ง
MD "Alpha Beta Gamma"


Make an entire path
MD creates any intermediate directories in the path, if needed.
For example, assuming \utils does not exist then:
ถ้าเราต้องการสร้างโฟล์และมีโฟล์เดอร์ย่อยๆอยู่ข้างในโดยปกติเราจะสร้างที่ละโฟล์เดอร์แล้วจึงเข้าไปสร้างเพิ่มตามที่เราต้องการดังเช่นตัวอย่าง


md \utils   สร้างโฟลเดอร์
cd \utils    เข้าโฟลเดอร์
md downloads สร้างโฟลเดอร์
cd downloads เข้าโฟลเดอร์
md Editor สร้างโฟลเดอร์

เช่นเดียวกับที่เราพิมพ์คำสั่งนี้
MD \utils\downloads\Editor

for long filenames include quotes
สำหรับชื่อไฟล์ที่ยาวใช้ฟันหนูด้วยครับ
MD "\utils\downloads\Super New Editor"


You cannot create a folder with the same name as any of the following devices:
คุณไม่สามารถสร้างโฟล์เดอร์แล้วตั้งชื่อเหมือนกับอุปกรณ์นี้ได้ เพราะระบบ DOS ได้จองการใช้งานไว้
CON, PRN, LPT1, LPT2 ..LPT9, COM1, COM2 ..COM9

Command line : Copy


Copy คำสั่งคัดลอก หรือ การทำสำเนา คำสั่งนี้ใช้ได้เฉพาะไฟล์เท่านั้น ทำการคัดลอกโฟล์เดอร์ไม่ได้
รูปแบบของคำสั่ง และ option เสริม

Syntax
      COPY [options] [/A|/B] source [/A|/B] [+ source2 [/A|/B]...] [destination [/A|/B]]

      COPY source1 + source2.. destination [options]

   
Key
     source :  Pathname for the file or files to be copied.   

                    ที่อยู่ของไฟล์ต้นสำเนา

        /A  :  ASCII text file (default)                                        

                 คัดลอกเป็นข้อความแบบ ASCII ตั้งเป็น default   
      
        /B  :  Binary file copy - will copy extended characters. 
                 คัดลอกแบบ ไบนารี่

        /D  :  Allow the destination file to be created decrypted.

destination :  Pathname for the new file(s).                        

                      ที่ปลายทางของไฟล์ใหม่ที่เราจะคัดลอก

        /V  : 
Verify that the new files were written correctly.  
                 ตรวจสอบไฟล์ที่เราคัดลอกว่ามีการคัดลอกถูกต้อง

        /N  :  If at all possible, create only short filenames (8.3) in the
               destination. This option can help when copying between disks
               that are formatted differently e.g NTFS and VFAT, or when archiving
               data to an ISO9660 CDROM.

        /L  :  If source is a symbolic link copy the link to the target
               instead of the actual file the source link points to.

        /Y  :  Suppress confirmation prompt, when overwriting files.
                 ให้เขียนไฟล์ทับโดยไม่ต้องให้เรายืนยัน


        /-Y :  Enable confirmation prompt, when overwriting files.

                 ถามทุกไฟล์ที่มีการเขียนทับ

        /Z  :  Copy files in restartable mode. If the copy is interrupted
               part way through, it will restart if possible. (use on slow networks)


ยกตัวอย่างการใช้งาน

หากเรามีไฟล์อยู่ไดร์ c:\ ต้องการให้อยู่ ในไดร์ d:\

c:\User\> copy c:\file.txt d:\file.txt
ถ้าต้องการตั้งชื่อใหม่สามารถตั้งได้เลย

c:\User\> copy c:\file.txt d:\new file.txt

>กรณีที่เราอยู่ในโฟล์เดอร์นั้นอยู่แล้วไม่จำเป็นต้องพิมพ์ Path เต็มก็ได้ครับให้พิมพ์ชื่อไฟล์ที่จะคัดลอกได้เลย

c:\User\> copy file.txt d:\new file.txt

หากต้องการทุกไฟล์ในโฟลเดอร์นั้น
c:\User\> copy *.* d:\

ต้องการเฉพาะนามสกุล
c:\User\> copy *.txt d:\


ปล.ถ้าผมจำไม่ผิด ระบบที่ ตั้งชื่อได้ไม่เกิน 8 ตัวอักษร
    - ระบบDOS ไม่ได้ติดตังบน windows
    - windows 95
    - windows 98
    - windows 2000
    - windows xp
    - windows3.1

หากตั้งเกินหลังอักษรตัวที่7จะแปลงเป็นตัวหนอน( ~ )ทันที หรือ เาลาเราใช้คำสั่ง DIR ก็จะแสดงให้เห็นเช่นกัน
ส่วน windows7 และ8 พัฒนาแล้วตั้งได้มากกว่า8อักษรขึ้นไป


Command Prompt


Command prompt หรือ CMD.EXE รู้จักกันทั่วไปเป็น command-line interpreter บนระบบปฏิบัติการ Windows NT,  Windows CE, OS/2 and eComStation มันจึงคล้ายคลึงกันกับ  command.com บน ระบบDOS และ ระบบWindows9x บางที่จึงเรียกว่า MS-DOS Prompt และมันก็คล้ายกับ Unix Shell บน ระบบUnix-like 


การใช้งานจะใช้แบบการพิมพ์ตัวอักษรทั้งหมด ทั้งการ copy เปลี่ยนชื่อ สร้างหรือ แก้ไขไฟล์ แทนการใช้เมาส์ที่เป็นรูปแบบทุกวันนี้เราใช้กัน
 
หากต้องการเรียกโปรแกรมใช้งานให้กด start > run  พิมพ์ "CMD" แล้วกด Enter หรือกดรูป windows + R แล้วพิมพ์ "CMD" แล้วกด Enter โปรแกรมก็จะปรากฏดังรูป
 
ยกตัวอย่างสิ่งที่น่าสนใจ
- Compare file  เอาไฟล์สองไฟล์มาเทียบกันว่าต่างกันบรรทัดไหน  
- การเขียน  Batch file

วันเสาร์ที่ 13 กุมภาพันธ์ พ.ศ. 2559

ลิงค์บทความ

Command line : MOVE

Command line : RMDIR

Command line : REN

Command line : MKDIR

Command line : DELTREE

Command line : DEL

วันพุธที่ 13 มกราคม พ.ศ. 2559

Command line : DIR (DOS)

สวัสดีครับ  วันนี้ว่าด้วยเรื่อง การดู ไฟล์และ ไดเร็คทอรี่ (โฟร์เดอร์) บทนี้ยาวหน่อยนะครับ นั้นก็คือ คำสั่ง DIR 
โดยปกติหากเราเล่นด้วย GUI (Graphical User Interface) หรือ รูปแบบWindows ก็ได้ เวลาเรา้เข้าไปในโฟล์เดอร์เราจะเห็นโฟล์ในนั้นด้วยรูปลักษณ์ที่สวยงาม
แต่ใน Command Line นั้น หากต้องการให้แสดงต้อง ใช้คำสั่งเพื่อให้แสดงผลออกมาให้เราเห็น แต่บนความลำบากที่เราต้องพิมพ์คำสั่งนั้น ยังมีข้อดีอยู่ คือ
คำสั่งนี้สามารถแสดงไฟล์หรือไดเร็คทรอรี่ที่ถูดตั่งค่า attributes ไว้ได้
 ยกตัวอย่างง่ายๆเช่น
 🚫ไฟล์ที่ถูกซ่อนไว้จะมองไม่เห็นในรูปแบบ GUI แต่ถ้าใช้คำสั่ง DIR /A:H จะสามารถเห็นไฟล์ที่ถูกซ่อนไว้😁

DIR

Display a list of files and subfolders
Syntax
      DIR [pathname(s)] [display_format] [file_attributes] [sorted] [time] [options]
Key
   [pathname] The drive, folder, and/or files to display, 
              this can include wildcards:
                 *   Match any characters
                 ?   Match any ONE character

   [display_format]
   /P   Pause after each screen of data.
   /W   Wide List format, sorted horizontally.
   /D   Wide List format, sorted by vertical column.

   [file_attributes] /A[:]attribute 

   /A:D  Folder         /A:-D  NOT Folder
   /A:R  Read-only      /A:-R  NOT Read-only 
   /A:H  Hidden         /A:-H  NOT Hidden
   /A:A  Archive        /A:-A  NOT Archive
   /A:S  System file    /A:-S  NOT System file
   /A:I  Not content indexed Files  /A:-I  NOT content indexed
   /A:L  Reparse Point  /A:-L  NOT Reparse Point (symbolic link)

   /A:X  No scrub file  /A:-X  Scrub file    (Windows 8+)
   /A:V  Integrity      /A:-V  NOT Integrity (Windows 8+)

   /A    Show all files
   Several attributes can be combined e.g. /A:HD-R

   [sorted]   Sorted by /O[:]sortorder

   /O:N   Name                  /O:-N   Name
   /O:S   file Size             /O:-S   file Size
   /O:E   file Extension        /O:-E   file Extension
   /O:D   Date & time           /O:-D   Date & time
   /O:G   Group folders first   /O:-G   Group folders last
   several attributes can be combined e.g. /O:GEN

   [time] /T:  the time field to display & use for sorting

   /T:C   Creation
   /T:A   Last Access
   /T:W   Last Written (default)

   [options]
   /S     include all subfolders.
   /R     Display alternate data streams. (Vista and above)
   /B     Bare format (no heading, file sizes or summary).
   /L     use Lowercase.
   /Q     Display the owner of the file.

   /N     long list format where filenames are on the far right.
   /X     As for /N but with the short filenames included.

   /C     Include thousand separator in file sizes. 
   /-C    Don’t include thousand separator in file sizes.

   /4     Display four-digit years
--------------------------------------------------------------------------------------------------------
ก่อนอื่นมารู้ถึงอักขระพิเศษสำหรับใช้ใน Command line คือ (*)
*   Match any characters คือ ทุกตัวอักษร
เช่น เราต้องการหาไฟล์เฉพาะนามสกุล txt เท่านั้น ให้ใช้คำสั่ง
>>  dir *.txt
เราต้องการหาไฟล์ ขึ้นต้นด้วย B ตามด้วยทุกตัวอักษรและลงท้ายด้วย1ให้ใช้คำสั่ง
>> dir B*1
-------------------------------------------------------------------------------------------------------
คำสั่งที่อาจจะต้องใช้ประจำ 
option  /P คือคำสั่งหยุดหน้าจอกรณีที่มีแสดงที่หน้าจอไฟล์มากเกินไป จะหยุดเมื่อแสดงเต็มหน้าจอและจะแสดงต่อเมื่อกดปุ่มใดๆ
>> dir /P
 
ให้กดปุ่มใดๆก็ได้เพื่อให้แสดงต่อหากแสดงเกินหน้าก็ยังจะมีขึ้นความ Press any key  to continue ต่อ 
 
-------------------------------------------------------------------------------------------------------
dir /w เปลี่ยนรูปแบบแสดง dir เป็นแนวกว้าง
-------------------------------------------------------------------------------------------------------
dir /b แสดงเฉพาะชื่อเท่านั้น  ตัดวันเวลา ขนาดไฟล์ และอื่นๆ
-------------------------------------------------------------------------------------------------------
dir /s ใช้แสดงไดเร็คทรอรี่ย่อยทั้งหมดที่อยู่ใต้ไดเร็คทรอรี่นั้นๆ  พูดง่ายๆคือ โชว์โฟเดอร์ย่อย
ถ้าไปอยู่ใต้ไดร์ C:\ มันจะแสดงทุกๆโฟร์เดอร์ที่มีในเครื่องครับ
ตัวนี้เวลาจะใช้เหมือนการหาไฟล์หรือโฟล์เดอร์ที่เราต้องการ และสามารถ ใช้หลาย option ในเวลาเดียวเช่น
ผมต้องการหา โฟร์เดอร์ Backup 
C:\Users\hongfong_k>dir backup /s /p /b  ความหมายคือ แสดงโฟร์เดอร Backup และค้นหาโฟล์เดอร์ย่อยด้วย ให้หยุดหาเต็มหน้าจอ และแสดงเฉพาะชื่อเท่านั้น 
ผลคือทุกโฟร์เดอร์ที่ชื่อตรง Backup จะแสดงพร้อม path